When teaching on Psalm 150 or any lesson involving praising the Lord, here is a fun (& noisy!) craft activity:
Praise cymbals
Supplies Needed:
Aluminum pie pans (2 per child)
Fun Foam cut into 6X2" strips (2 per child)
Brads (2 per child)
I don't know what they're called, but those little circles you put on paper to reinforce the holes (4 per child)
Prepare Ahead:
Using a screwdriver or other sharp instrument, carefully poke holes in the center of the pie plates about 4 inches apart. Flatten out any aluminum sticking up around the holes. Cover both front and back of these holes with those little reinforcer thingy's (!), to protect fingers from being cut by the sharp aluminum. Measure about 1 inch from either end of foam strips and mark with small x's.
In Class:
Students line up x's on foam strips with holes in pie plates and gently push brads through both, then bend in back to secure in place. They may then put hands through these "handles" to where their palms are flat against the pie plates and the foam strips are over the back of their hands, and clang the plates together like cymbals. If desired, they may decorate their cymbals with stickers or permanent markers.
Suggestion for use:
Guide the students in joyfully praising the Lord for all that He is and all that He does. Spend some quiet time allowing the Holy Spirit to reveal to each student one thing for which they can praise Him, then go around the circle and have each student complete this statement: “I praise You, God, because...” Remind them to praise Him joyfully! They may clang their cymbals 3 times after sharing their praise. In addition you may want to play some upbeat praise music and allow the children to march around the room crashing their cymbals to the beat.
------------------------------------------------------------------------------------------------------------------------------------
FAITH BRACELETS
------------------------------------------------------------------------------------------------------------------------------------
FAITH BRACELETS
Supplies Needed:
"Magic Scratch" paper bracelets ordered from Oriental Trading Company www.OrientalTrading.com or you can purchase this special paper at a craft store and cut it into strips for bracelets.
Say to students, “When we look at these bracelets, they look plain and black, but when we use the stick to scratch a design, the beautiful colors show through. This reminds us of seeing things here on earth. If we look with our ‘earth eyes’, we see sickness, sadness, and fear. The stick is like our key to the kingdom. When we scratch the design, it reveals the greater reality underneath the black. When we see things with our ‘faith eyes’, we see what’s going on in heaven and we bring Heaven to earth by praying for healing, joy, and peace. As you wear these bracelets, let them remind you to use your ‘faith eyes’."
---------------------------------------------------------------------
THE ARTIST, THE MODEL, AND THE CLAY
---------------------------------------------------------------------
THE ARTIST, THE MODEL, AND THE CLAY
Supplies Needed:
modeling clay
various objects that would be simple for the kids to use as models
What to do:
Place various objects on the table and instruct students to use them as models for shaping clay to look the same. Say, “You tried to make your clay look just like the model. The Holy Spirit does the same thing. He is like the artist. You are like the clay. Jesus is the model. The Holy Spirit molds us to look like Jesus.”
Scripture References: 1 John 4:17, Ephesians 5:1-2, 8-10
-------------------------------------------------------------------------------------------------------------
FREEDOM FROM FEAR SCRIPTURE BOXES
-------------------------------------------------------------------------------------------------------------
FREEDOM FROM FEAR SCRIPTURE BOXES
Supplies Needed:
index card holders (1 per child)
index cards (depends on how many verses each child will write)
stickers
markers, pens, pencils
Prepare ahead:
Select several scriptures that combat fear (or whatever theme you are doing). Older students will copy these verses from their Bibles. For younger students, you will write out the verses on the lined side of the cards, leaving a blank every now and then for them to write the word in or draw a picture representing the word.
Decorate “Freedom From Fear” scripture boxes using markers and stickers.
Say, “These boxes are for you to keep beside your bed. Throughout this series, we will add cards with scripture prayers that help us battle fear.”
Read Eph. 6:10-17. “What did it say the sword of the spirit is? The Word of God. Out of all our armor, that is the only offensive weapon we have. When we pray God’s Word out loud, it is like taking our sword and thrusting it at the enemy. Fear must leave when we tell it to leave in Jesus’ Name! No matter how small or gentle a person is, we are all warriors who carry a mighty sword! Don’t be shy about using that sword!”
Older students will write out scriptures on the lined side of their cards. Younger students will either fill in the blank with the appropriate word or with a picture. Students may also draw pictures on unlined side of card to represent verses if desired.
Variation: We made these when in a series on gaining freedom from fear, but they would be appropriate for other topics as well, such as The Word, the armor of God, authority over the enemy, etc. Another option is to use dividers to categorize areas of struggle, such as fear, disobedience, sadness, etc. and make scripture cards relevant to each.
----------------------------------------------------------------------------------------------------------
THANKSGIVING TREE
----------------------------------------------------------------------------------------------------------
THANKSGIVING TREE
Supplies Needed:
brown butcher paper or poster board
fall-colored card stock or construction paper
Die cut letters or homemade sign with a scripture about giving thanks printed on it.
scissors
pencils
markers
Prepare Ahead:
Cut butcher paper or poster board to look like tree trunk and branches. Hang on wall. Hang Thanksgiving scripture above it.
In Class (or at Home if doing with your own kids)
Assist children in tracing their hands onto the card stock or construction paper. Tell them that these will be the leaves on our Thanksgiving Tree. Encourage them to write or draw as many things as they can fit on the leaves for which they are thankful, then attach them to the tree. To really make it look like a fall tree, attach some of the leaves as if they are falling from the tree or have already fallen to the ground. Do this each week (or each day if doing at home) between now and Thanksgiving to remind your class or family of all the blessings God freely gives us.
---------------------------------------------------------------------------------------------------------------------
THANKSGIVING BASKETS
---------------------------------------------------------------------------------------------------------------------
THANKSGIVING BASKETS
Supplies Needed:
basket, box, or other container
paper slips
Prepare Ahead:
You can decorate the basket or box as elaborately or simply as you want. We have made them before to resemble turkeys or cornucopias. Use your imagination!
In class or at home:
Encourage children to write things or draw pictures of things for which they are thankful on the paper slips and place them in the container. At the end of class or on Thanksgiving Day, pull out the papers one at a time and thank God for each.
Option: One year at our homeschool group's Thanksgiving Feast, each family created one of these Thanksgiving baskets as the centerpiece for each table. Maybe you could have each Sunday School class work together to create a basket to put on display somewhere in the church building and encourage other church members to write what they are thankful for on the paper slips.
----------------------------------------------------------------------------------------------------
THANKSGIVING CARDS
----------------------------------------------------------------------------------------------------
THANKSGIVING CARDS
Supplies Needed:
paper or cardstock
Thanksgiving themed stickers
markers, crayons
other card making materials
Exchanging Christmas cards is a tradition, of course, but how about surprising someone with a Thanksgiving card this year! Everyone enjoys being thanked for something. What a fun blessing to the recipient! Encourage students to make cards for family and friends, but it might also be fun to have them think about people they don't know as well, but who provide services for them. For example, the church custodian or tech guys...the bank teller...the cashier at the grocery store...the school bus driver...the pizza delivery guy...the nice man who holds the door open for them and greets them every Sunday at church...you get the idea! To make it even more fun, tell the students to get creative and try delivering the cards anonymously!
-----------------------------------------------------------------------------------------------------------------------
BLESSING BOXES
-----------------------------------------------------------------------------------------------------------
SCROLL OF REMEMBRANCE
 Supplies Needed:
-----------------------------------------------------------------------------------------------------------------------
BLESSING BOXES
Supplies Needed:
Small boxes, such as shoebox size for each student (or family member if doing at home)
Plain wrapping paper
Tape
Scissors
Markers
Stickers
Small paper slips
Pencils
Wrap boxes and lids separately. Students may decorate with stickers and markers. Cut slit in lid large enough for slip of paper to fit through. Make sure everyone puts their names large enough for everyone to see. Place somewhere in the classroom where they will be easily accessible but not in the way of other activities or if doing at home, place in bedrooms or other designated spot.
Encourage children (and adults) to bless one another by writing encouraging notes or words of thanks on the paper slips and placing them in the recipients' boxes. Do this over a certain time period, then designate one day as Count Your Blessings Day! If doing at church, perhaps you could spend time each week for a month allowing students to bless one another, then set aside some time on the last Sunday of the month for everyone to read their blessings. If doing this at home, maybe you could designate Thanksgiving Day as the day you read your blessings. Of course, this is a wonderful activity to do all through the year - not just around Thanksgiving time!
-----------------------------------------------------------------------------------------------------------
SCROLL OF REMEMBRANCE
Supplies Needed:Large Binder with clear pocket on the front to slip a cover sheet into
Sheet Protectors
Scrapbooking paper and supplies
A wonderful way to count your blessings is by making a class or family Scroll of Remembrance.
Make a cover sheet for the binder with Malachi 3:16 "Then those who feared the Lord talked with each other, and the Lord listened and heard. A scroll of remembrance was written in His presence concerning those who feared the Lord and honored His name."
I love that it says "the Lord listened and heard". When we recount what God has done in our lives, He listens and I can just imagine the delight it gives Him to hear His children telling of His glory.
Encourage children to write or draw pictures of ways God has blessed them, miracles He's done in their lives, things they are thankful for, etc. and place them in sheet protectors in binder. Another option would be to take pictures throughout the year and include them in your scroll of remembrance as reminders of God's blessings and faithfulness.
-------------------------------------------------------------------------------
WHAT DOES GOD WANT FOR CHRISTMAS?
-------------------------------------------------------------------------------
WHAT DOES GOD WANT FOR CHRISTMAS?
A friend shared this idea and I just LOVED it!
Use as a craft project or object lesson.
Get a gift box and glue a small mirror to the inside bottom. On the outside lid, write "What does God want for Christmas?". When child opens the box and looks inside, they see their own reflection!
What does God want for Christmas? YOU!
----------------------------------------------------------------------------------------------
Handprint and Fingerprint Christmas Crafts

----------------------------------------------------------------------------------------------
Handprint and Fingerprint Christmas Crafts
I'm a sucker for handprint and fingerprint crafts! I love capturing those sweet memories while they're still little, because as we all know, they sure don't stay that way long!
Here are links to some cute Christmas crafts:
http://dltk-holidays.com/xmas/mxmashands.html
http://dltk-holidays.com/xmas/mfingerprint-holly.htm 
-------------------------------------------------------------------------------------------------
Special Memories Christmas Cards
-------------------------------------------------------------------------------------------------
Special Memories Christmas Cards
Digital cameras and personal printers make it possible to have instant photos without having to compromise quality. (remember the old days when we used Polaroids???)
If you teach Sunday School or another small group, take a group photo to insert in a handmade Christmas card or ornament as a gift for each of your students. It will be fun for them to look back at these in a few years and remember their classmates. Better yet, ask someone else to take the photo, so you can be in it as well. As their teacher, you have sown eternal seeds into their lives! They may not always act like they appreciate it now, but years down the road, they will cherish this reminder of a time in their lives when they were being introduced to God and His Word.
While you're at it, have the students make some cards or gifts to hand deliver to some folks at church who could use some Christmas cheer...perhaps an elderly person with no family around, or someone who recently lost a loved one...don't forget the servant-hearted folks who clean the bathrooms and run the sound system...ask God who He has in mind to receive one of these precious gifts of love from your class.
------------------------------------------------------------------------

------------------------------------------------------------------------
WALKING WITH GOD
Supplies:paper
washable paint
paper towels
Instructions:
Either go outdoors and make actual footprints by dipping foot in paint and stepping on paper or make tiny footprints by using finger to apply paint to pinky side of fist, then press onto paper. Use fingertips to make "toes". So cute!
This is a great craft for learning about Enoch, who is described in the Bible as someone who walked with God.
Ask students how they can walk with God.
--------------------------------------------------------
FAITH HEROES COMIC BOOKS
--------------------------------------------------------
FAITH HEROES COMIC BOOKS
When teaching Hebrews 11 (AKA Hall of Faith), kids can make "comic books" to resemble superhero comic books. Take a presentation folder with brads and several sheets of blank paper, and have kids decorate cover. Take several weeks to teach through the various heroes mentioned in these verses and have kids illustrate them comic book style.
Next read stories of more modern day faith heroes, such as Amy Carmichael or David Livingstone and have them illustrate the stories.
Finally, ask kids how they too can be faith heroes and have them illustrate what God shows them.
---------------------------------------------------------
 There are numerous ideas on the web for creating Easter baskets. One of my favorites was taking berry baskets and weaving ribbons or fabric strips through the openings. Line with straw or tissue paper and fill with any number of things...candy, slips of paper with scriptures, sample size toiletries, etc. Give as a gift to someone special.
---------------------------------------------------------
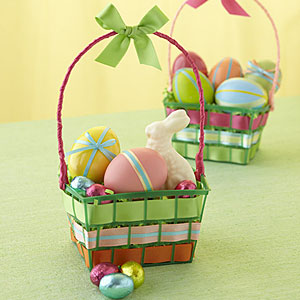
EASTER BASKET CRAFTS
There are numerous ideas on the web for creating Easter baskets. One of my favorites was taking berry baskets and weaving ribbons or fabric strips through the openings. Line with straw or tissue paper and fill with any number of things...candy, slips of paper with scriptures, sample size toiletries, etc. Give as a gift to someone special.These can also be made when learning about baby Moses' mother hiding him in the basket or when learning about missionaries to Africa, where basket-weaving is popular.
What's your favorite Easter craft idea?